

Unveiling Auditing Excellence: Microsoft Purview’s Advanced Features
Blogs / Unveiling Auditing Excellence: Microsoft Purview’s Advanced Features

Wishv Prajapati
April 23, 2024

Auditing is the process of investigating security events, conducting forensic investigations, complying with internal regulations, and meeting external compliance obligations. It involves capturing, recording, and retaining a unified audit log.
In other words, it means keeping a close eye on what happens in the system. It checks actions, changes, and who accesses data to follow rules and keep everything secure. It helps manage risks and ensures that everything meets the required standards.
In Microsoft 365, there are two Auditing options:
- Audit Standard: This is the basic option with lots of searchable events stored for 90 days. You can export these records easily.
- Audit Premium: This is more advanced. It includes everything in Audit Standard but also keeps records longer, identifies important events, and allows more data access.
Key Features of Audit New Search
- Customizable Query Parameters: The tool offers flexibility in defining search parameters, allowing users to tailor audits based on date ranges, data types, or specific compliance criteria.
- Intelligent Insights: Leveraging Microsoft’s robust algorithms, Audit New Search provides insightful data analytics, enabling users to extract actionable insights from the audit results.
- Comprehensive Reporting: Generate detailed reports summarizing audit findings, facilitating comprehensive analysis, and aiding in compliance improvement strategies.
- User-Friendly Interface: The intuitive interface ensures ease of navigation, allowing both novice and experienced users to navigate the tool effectively.
Benefits of Microsoft Purview’s Audit:
- Improved security posture: By understanding what is happening in your Microsoft 365 environment, you can identify and address security threats more quickly.
- Reduced compliance risk: Audit logs can help you demonstrate compliance with internal regulations and external compliance requirements.
- Improved incident response: Audit logs can provide valuable evidence in the event of a security incident.
- Enhanced investigations: Audit logs can help you investigate security incidents and other events more effectively.
How to Audit with Microsoft 365
Auditing in Microsoft 365 is part of Microsoft Purview. Thousands of actions and operations conducted across Microsoft 365 services and solutions are reported in your organization’s unified audit log. IT admins, risk teams, and compliance and legal operators within an organization can search audit logs using the audit log search tool.
You must be assigned the Audit Logs role in the Microsoft Purview compliance portal to turn auditing on or off in your Microsoft 365 organization. By default, this role is assigned to the Audit Manager, Organization Management, and Security Administrator role groups on the Permissions page in the compliance portal.
Verify the Auditing status for your organization
Audit logging is turned on by default for Microsoft 365 organizations. However, when setting up a new Microsoft 365 organization, you should verify the auditing status for your organization.
Use PowerShell to turn on Auditing
To verify that auditing is turned on for your organization, Execute the subsequent command in PowerShell, following each step.
Step 1: Import-Module ExchangeOnlineManagement
Step 2: Connect-ExchangeOnline -UserPrincipalName <UPN>
“UPN is your account in user principal name format (for example, xyz@contoso.onmicrosoft.com).”
In the sign-in window that opens, enter your password, and then click Sign in.
MFA only: A verification code is generated and delivered based on the response option that’s configured for your account
Step 3 : Get-AdminAuditLogConfig | Format-List UnifiedAuditLogIngestionEnabled
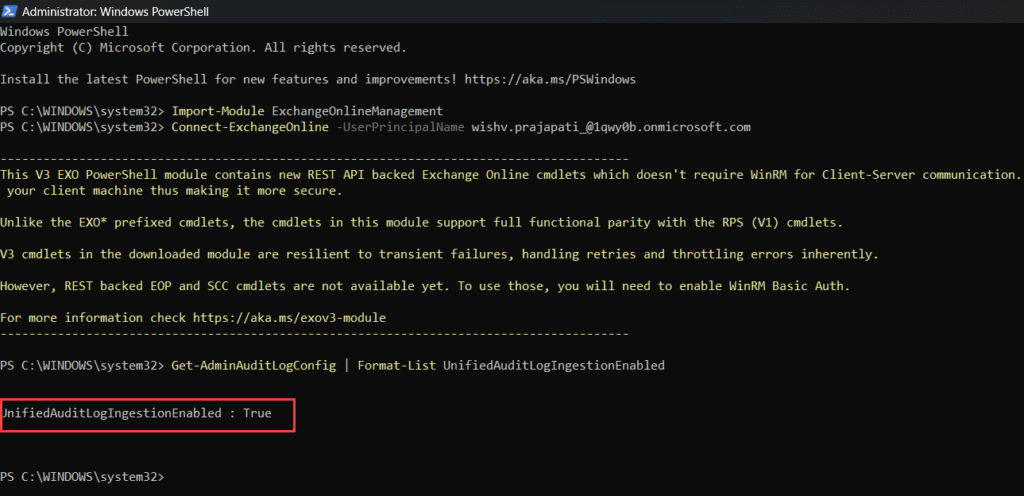
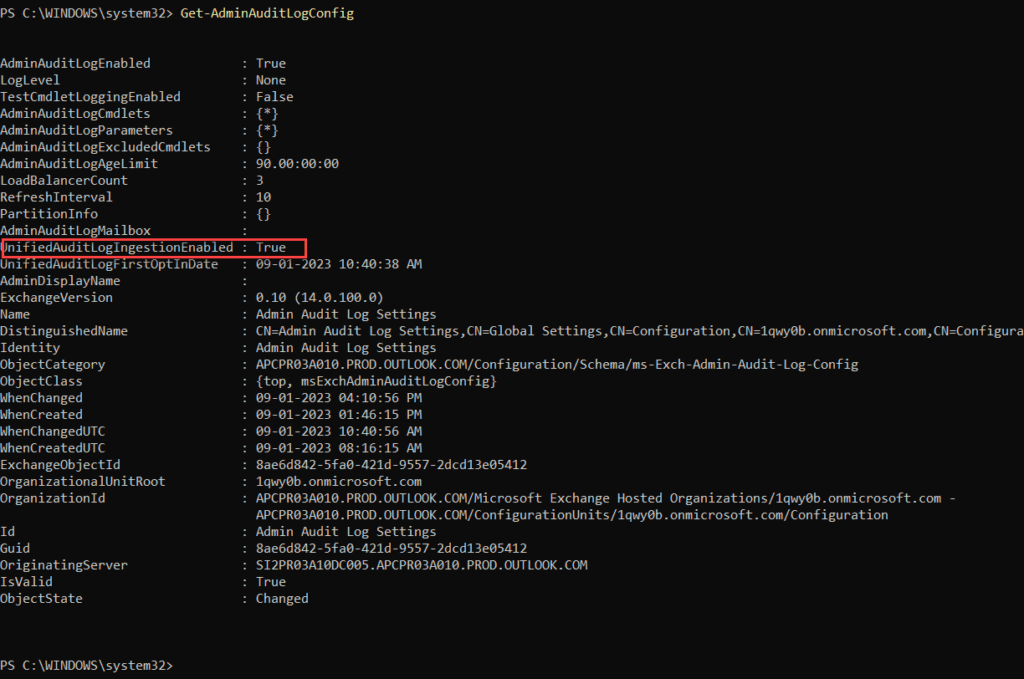
A value of True for the “UnifiedAuditLogIngestionEnabled” property indicates that auditing is turned on. A value of False indicates that auditing isn’t turned on.
Be sure to run the previous command in Exchange Online PowerShell. Although the Get-AdminAuditLogConfig cmdlet is also available in Security & Compliance PowerShell, the UnifiedAuditLogIngestionEnabled property is always False, even when auditing is turned on
Assign permissions from compliance portal to scope Audit logs
The following screenshot shows the two audit-related role groups in the compliance portal.

To search or export the audit log, administrators or members of investigation teams must be assigned to at least one of the following audit-related role groups in the compliance portal
Audit Manager: A user assigned to the Audit Manager role group can search and export the audit log and manage audit settings for the tenant (like enabling or disabling audit logging). This role group grants the View-Only Audit Logs and Audit Logs roles to the user.
Audit Reader: A user assigned to the Audit Reader role group can only search and export the audit log. They can’t enable or disable audit logging. This role group grants the View-Only Audit Logs role to the user
Search the Audit log in Microsoft Purview
Now you’re ready to search the audit log in the Microsoft Purview compliance portal.
1. Go to https://compliance.microsoft.com and sign in using an account that has been assigned the appropriate audit permissions.
2. Select the Audit tab on the left panel of the homepage to navigate to the Audit tool.
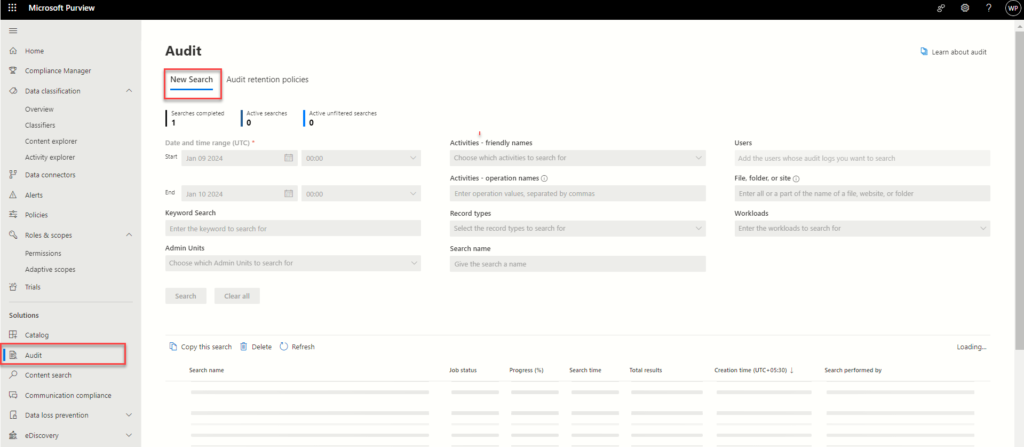
3. Select New Search tab at the top of the Audit page.

4. On the New Search tab, configure the following search criteria as applicable:
- Date Range: Choose a date range up to 180 days to view events, with the default set to the last seven days in Coordinated Universal Time (UTC).
- Keyword Search: Look for specific words or phrases in the audit log, replacing special characters with asterisks for text containing such characters.
- Admin Units: Filter audited activities based on specific administrative units within your organization.
- Activity Names: Select user or admin activity groups or individual activities to focus your search in the log.
- Operation Names: Specify exact operation names to refine search results, enabling flexible data discovery.
- Record Types: Filter audited activities based on specific types for more targeted search results.
- Search Name: Create a custom name for your search job to distinguish it in the search job history.
- Users: Choose specific users to see their related audit log entries or leave blank for all users.
- File, Folder, or Site: Search for file or folder activities by entering related keywords or URLs.
**Select Search to start your search job. A maximum of 10 search jobs can be run in parallel for one user account. **
Search Job dashboard
Active and completed search jobs are displayed in the search job dashboard. The dashboard displays the following information for each search job:

- Search name: The name of the search job. The full search name for a job can be seen by hovering the cursor over the search job name.
- Job status: The status of the search job. The status can be Queued, In Progress, or Completed.
- Progress (%): The percentage of the search job that has been completed.
- Search time: The total running time that elapsed to complete the search job.
- Total results: The total number of results returned by the search job.
- Creation time: The date and time the search job was created in UTC.
- Search performed by: The user account that created the search job.
Search Job details dashboard
To view details about a search job, select the search job. The total number of items in the job is included at the top of the dashboard. The total result number deducts duplicates, which is why it might be less than the number of items in the search job dashboard.
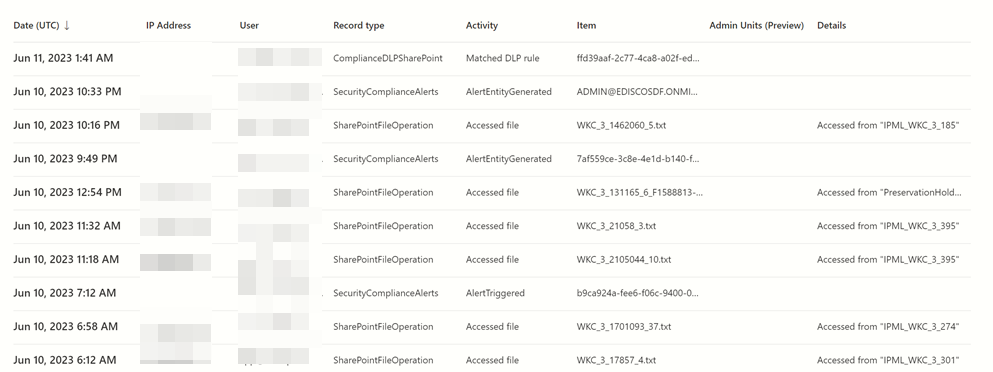
The search job details dashboard displays following information about the individual items gathered in the search job results:
- Date (UTC): The date and time the activity occurred.
- IP Address: The IP address of the device that was used to perform the activity.
- User: The user account that performed the activity.
- Record type: The record type associated with the activity.
- Activity: The friendly name of the activity that was performed.
- Item: The name of the file, folder, or site that the activity was acted on.
- Admin Units: The admin unit that the user account that performed the activity belongs to.
- Details: Additional details about the activity.
Export the Audit report
This option exports all the audit records from the audit log search you ran, and adds the raw data from the audit log to a CSV file. It takes a while to prepare the download file for a large search. Large files will result when searching for all activities or using a wide date range.
Format the exported Audit log using the Power Query Editor
The next step is to use the JSON transform feature in the Power Query Editor in Excel to split each property in the JSON object in the Audit Data column into its own column. Then you filter columns to view records based on the values of specific properties. This can help you quickly locate the specific auditing data you’re looking for.
1. Open a blank workbook in Excel for Office 365, Excel 2019, or Excel 2016.
2. On the Data tab, in the Get & Transform Data ribbon group, select From Text/CSV.
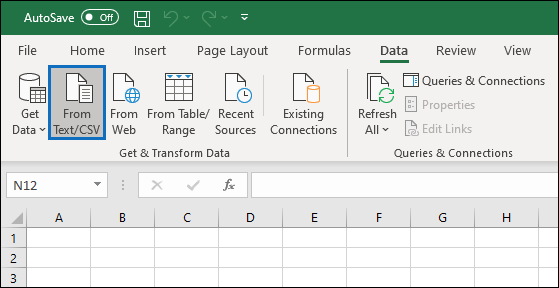
3. Open the CSV file that you downloaded in Step 1.
4. In the window that’s displayed, select Transform Data.
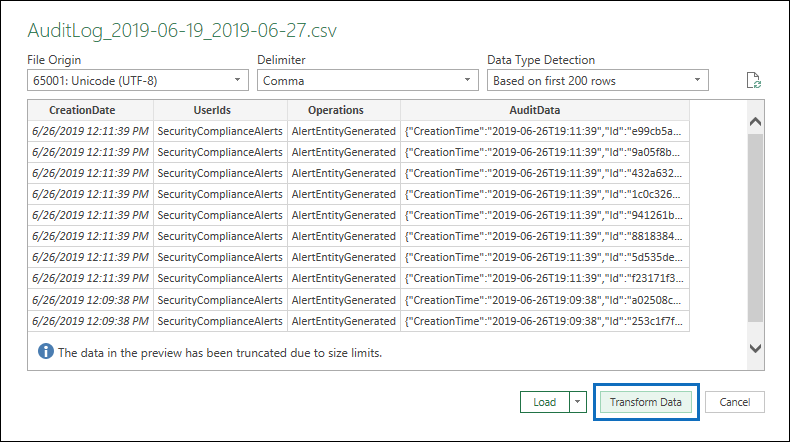
The CSV file is opened in the Query Editor. There are four columns: Creation Date, User Ids, Operations, and Audit Data. The Audit Data column is a JSON object that contains multiple properties. The next step is to create a column for each property in the JSON object.
5. Right-click the title in the Audit Data column, select Transform, and then select JSON.
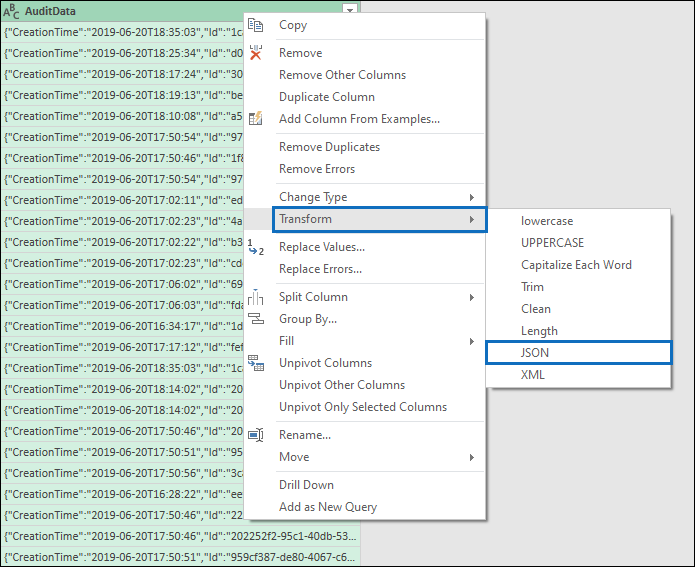
6. In the upper-right corner of the AuditData column, select the expand icon.
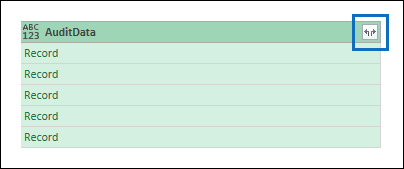
7. Select Load more to display all properties in the JSON objects in the AuditData column.
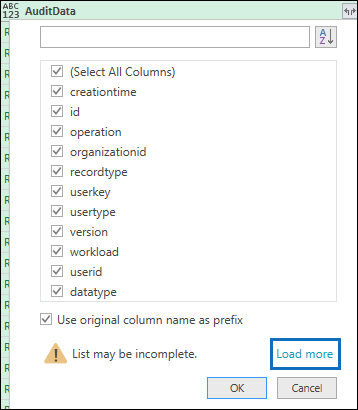
You can unselect the checkbox next to any property that you don’t want to include. Eliminating columns that aren’t useful for your investigation is a good way to reduce the amount of data displayed in the audit log.
Want to talk?
Drop us a line. We are here to answer your questions 24*7.
